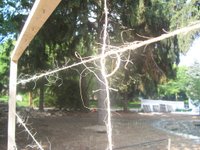
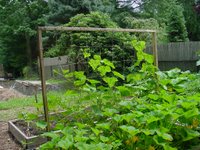
Building A Garden Trellis

One good thing about Garden Blogging through the winter is that you have nothing to post about. So you can go back to all those photos that you took over the summer but never had time to blog about and finally catch up. Today I’m going to play catch up and I’m Building a Garden Trellis.
Space is limited in my raised beds, so I have to garden vertically when I can and make use of every square inch. This year, I decided that squash and cucumbers would share a 4x8 bed. The cucumbers needed a trellis. 
If you’re looking for a fancy trellis made by a woodworker or someone who can bend and twist wrought iron to make art, then you’ll have to look elsewhere. This is a quick and easy trellis made from wood and twine.
The posts are 1x2’s. You could use 2x4s but 1x2s are cheaper and they’re strong enough to support the weight of most veggies so why not save a few dollars. You’ll need two 1x2s to use as posts and one as a cross piece that goes across the top.  I avoid the whole old pressure treated wood (CCA) vs. new pressure treated wood (ACQ) in the garden argument by using regular lumber. It’s going to rot in a few years, but at $1.88 for an 8 foot 1x2, I’d rather replace the wood instead of worrying about chemicals leaching into the soil. Will they or won’t they? That’s a question for someone else.
  Each post should be buried at least 18” deep or if you’re building a trellis that will go inside a raised bed like mine, then you can secure it to the frame with 2 more screws. Remember that you’ll want the two posts to be the same height so that the cross piece is level. A laser level is a great tool to easily accomplish this. If you don’t have a laser level then place the cross piece on top and use a regular bubble level. Use a hammer to slowly tap the posts into the ground. If you keep knocking the cross piece off, then duct tape it. Once you’re level, use two 3 inch galvanized screws to secure each joint. If you’re worried about the wood cracking, then pre-drill your holes.
  Now measure and make pencil marks one foot apart going down from the top and then along the cross piece. Partially drill a short screw with a large head (or add a washer) into each mark. These screws are for attaching your twine. Tie a knot around the first screw and then screw it in the rest of the way so that the twine is secure. Fasten the string going horizontally across the trellis and then going vertically, screwing the screws in as you go. When going from top to bottom, tie a knot in the twine every place that it crosses the horizontals.
As I said before, my trellis may not look good enough for a gardening magazine but it sure did the job. 
12/18/2006 11:27:00 PM
|
Labels:
garden projects,
trellis
|
This entry was posted on 12/18/2006 11:27:00 PM
and is filed under
garden projects
,
trellis
.
You can follow any responses to this entry through
the RSS 2.0 feed.
You can leave a response,
or trackback from your own site.


I used cedar to build some of my raised beds but lately I just use regular wood. Cedar is so expensive!
I've never done raised beds.
You have me thinking about it now.
I tried it once but didn't have much success. I think a woodchuck ate all my corn seedlings so I just had a bed of beans.
Maybe you'll have better luck.
And it doesn't have to be ugly anymore either. They sell spray paint now that especially made for plastic. A nice coat of green paint would blend in with most gardens.
In these pictures (2 years ago) those were Kirby cucumbers and 12" seedless cucumbers. And I got the seeds from Burpee for both of them. Good luck with your cucumbers this year.